Contents
5. Export a Local Project as a File
7. Upload a local project to the server
Once a user has logged in to the application, the Local Project page is displayed. Here, the user can first switch between the Local Projects and Server Projects tabs.
The overview of local projects includes columns for project name, the date of the last modification, and a description.
It also displays the number of alternatives in a project. The buttons on the right-hand side of an entry allow the user to upload a project and perform other editing and management tasks.
Figure 1 shows the overview of locally created projects. If the user has not yet created a project, the list is empty.
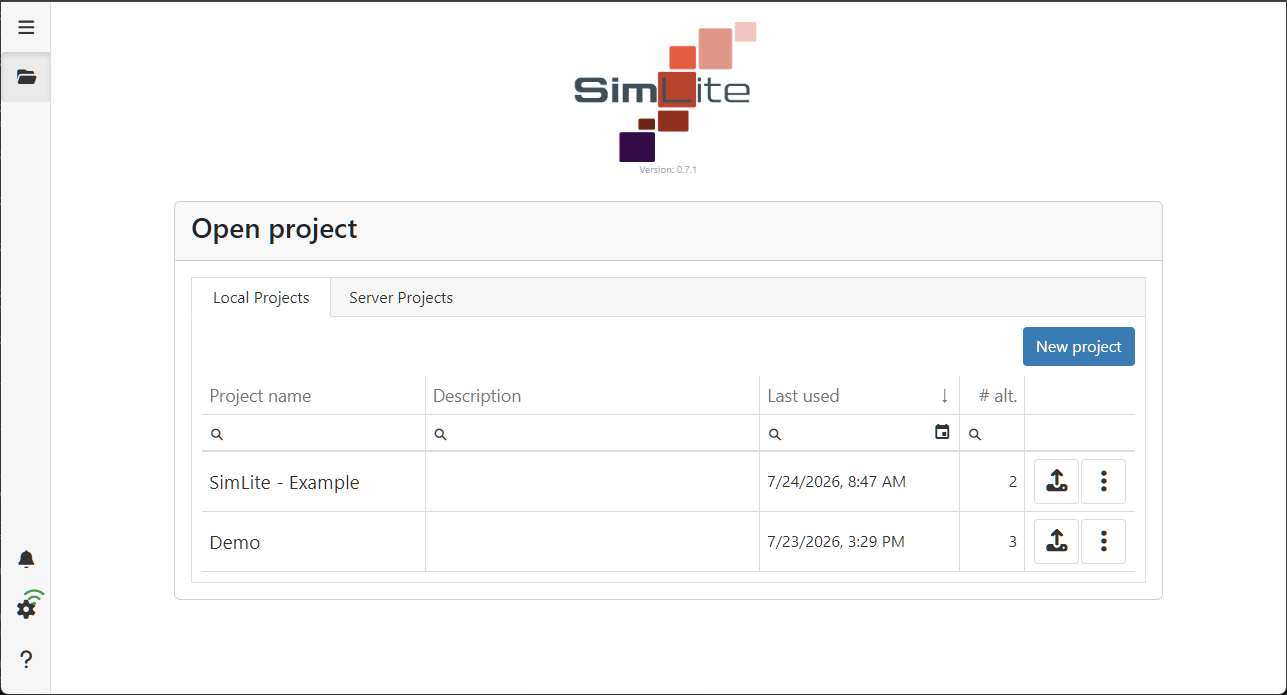
Figure 1 - Overview of Local Projects
As the list of local projects grows, the displayed entries can also be filtered using selectable filters (for each individual column) (see Figure 2).
Furthermore, the local overview is limited to projects belonging to the logged-in user; that is, if multiple users are working on the same computer, a personalized view is guaranteed.
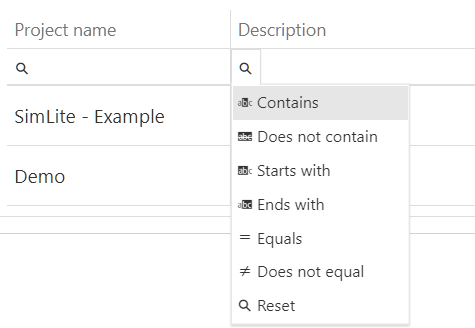
Figure 2 - Project Overview with Filter
Clicking the New Project button allows you to create a new local project. This opens a new window where you can either create a new project (see Figure 3) or import an existing one.
To create a new project, you must first assign a project name. This field is required. The Description field is optional. Clicking the Create button completes the project creation process.
This automatically switches the view to the modeling interface. When importing a project, the view also automatically switches to the first alternative of the project.

Figure 3 - Create New Project
To import an existing project, you must first select it using the Select a file button
|
Note: Only files with the *.simlite extension can be imported. |

Next, just as when creating a new project, you must assign a project name.
If a local project with the same name already exists, the name must be changed in the Project name field (see Figure 4).

Figure 4 - Project Name Already Taken
Clicking the Import button completes the project creation. This automatically returns the view to the project overview.
You can return to the project overview at any time by clicking the Project Overview button.
The |
|
button opens the context menu for each local project. From here, you can edit the project by clicking the Edit button. |

This opens a new window where you can edit the project properties (project name and description).
Clicking the Save button completes the editing of the project. This automatically returns the view to the project window
The Duplicate button opens a dialog box where you can edit the name of the duplicated project and the alternatives to be duplicated (if any)
5. Export a Local Project as a File
The Export button opens a dialog where you must specify what to export; at least one item must be selected.
Optionally, you can also use this dialog to export photos that were taken. Confirming the dialog (by clicking Export) opens Windows Explorer, where you can select the save path.
The project is then saved as a *.simlite file at the selected path and can, for example, be shared or archived offline.
The Delete button opens the following dialog. If you confirm this dialog by clicking Yes, the project will be deleted and cannot be recovered!

Figure 5 - Note when deleting a project
7. Upload Local Project to the Server
By clicking the button |
|
the respective project can be uploaded to the server. The project is then available in the Server Projects tab. |

|
Note: Each local project has its own ownership or usage rights. These ownership rights are also saved when a project is uploaded to the project server. As a result, only the user is authorized to manage or remove shares or to overwrite the server project. If a project (or its unique project ID) already exists on the server, a confirmation prompt will appear before overwriting it. |
© SimPlan AG - Hanau District Court, Commercial Register (Part B) 6845 - info@simplan.de - www.simplan.de/en